Gone are the days of static photo prints gathering dust on a shelf. A smart home photo frame connects to your smartphone, cloud storage, or social media accounts, letting you refresh your displayed memories instantly, no uploading required. Whether you’re keeping distant relatives’ faces visible on your nightstand or rotating through your best vacation shots in the living room, these devices have become genuine quality-of-life upgrades for many homeowners. This guide walks you through what a smart photo frame is, why it matters, and how to choose and install one that fits your home.
Table of Contents
ToggleKey Takeaways
- A simply smart home photo frame automatically syncs your latest photos from cloud storage or social media, eliminating the need for manual uploads and keeping important relationships visible across distances.
- Prioritize frames with native cloud integration (Google Photos, Amazon Photos, iCloud), user-friendly apps paired with physical buttons, and motion-sensor technology to ensure reliable daily use and energy efficiency.
- Mid-range smart photo frames ($150–250) offer the best value with solid build quality and dependable syncing, while 1080p resolution and 8-15 inch sizes suit different placements from desks to gallery walls.
- Smart photo frame setup takes under an hour: connect to Wi-Fi, link your cloud account, select themed photo albums (50-100 favorites work best), and confirm images sync within 30 minutes.
- Style your smart frame with a finish matching your décor, position it with good natural lighting and complementary décor objects nearby, and curate 50-100 quality photos rather than syncing your entire library for a polished, intentional display.
- Check verified user reviews on tech sites before purchasing to identify real-world issues like connection reliability and hidden subscription costs that manufacturer descriptions often overlook.
What Is a Smart Photo Frame and Why Should You Care?
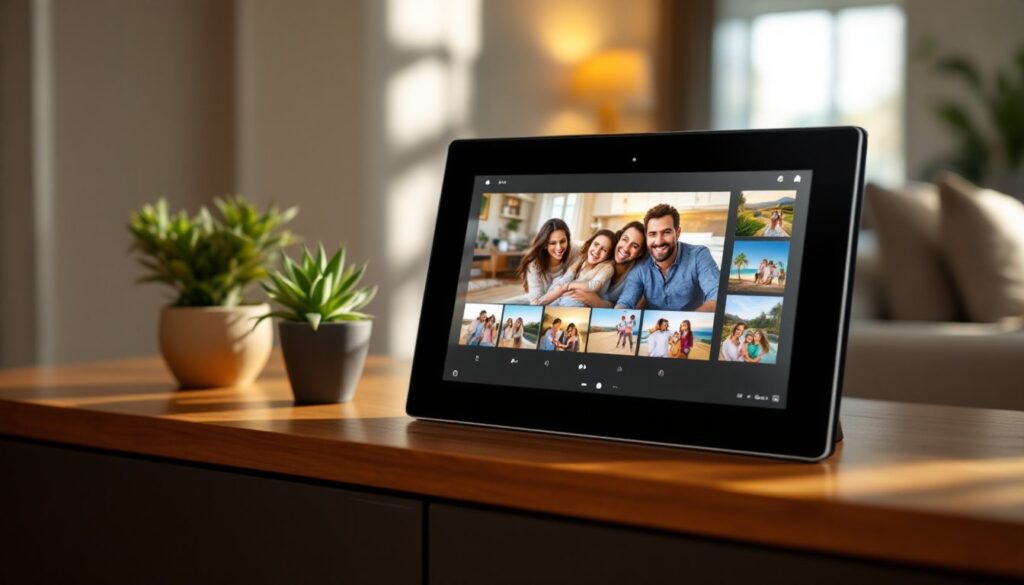
A smart photo frame is a connected display device, think of it as a digital picture frame with Wi-Fi built in. Instead of inserting an SD card or plugging in a USB drive, you control it from your phone or computer. Frames pull images from cloud services like Google Photos, Amazon Photos, OneDrive, or directly from social media platforms.
Traditional digital frames are static: you physically load photos onto them. Smart frames sync automatically, meaning your latest photos appear on the display within seconds of uploading them to the cloud. Family members scattered across the country can send pictures directly to a shared frame without you lifting a finger.
Why does this matter? First, it keeps important relationships visible. A grandparent living far away can see this week’s school photo without waiting for an email chain. Second, it eliminates the guilt of thousands of photos sitting buried in your phone’s camera roll. Third, it’s genuinely convenient, rotating seasonal memories or swapping art becomes a tap on your phone rather than a project.
These frames vary in size (typically 7 to 15 inches diagonal), resolution, and connectivity options. Some include voice control, motion sensors that activate the display only when you’re nearby, or ambient light sensors that adjust brightness automatically. When evaluating whether a smart photo frame suits your home, consider your daily routine, the room’s lighting, and whether you want a frame that doubles as ambient décor.
Key Features That Make Simply Smart Photo Frames Stand Out
Not all smart frames are equal. Before choosing one, understand the features that separate reliable performers from frustrating purchases.
Easy Setup and User-Friendly Interface
Setup should take under 10 minutes. Connect the frame to Wi-Fi, sign into your cloud service or social media account, and choose which photos or albums to display. No complex networking knowledge required, if you can connect your phone to home Wi-Fi, you can set up a smart frame.
The interface matters heavily for daily use. Some frames let you control everything through a companion smartphone app: others have physical buttons or touchscreen controls built into the frame itself. Touchscreen frames feel more intuitive but are susceptible to fingerprints and dust, especially in high-traffic areas. Button-controlled frames stay cleaner and work fine once you learn the layout, though they’re slower to navigate.
A good simply smart home photo frame offers both options: an easy app for remote control and simple physical buttons as backup. Look for frames with clear, readable menus, tiny fonts defeat the purpose of a beautiful display. If you’re gifting a frame to an older relative, prioritize simplicity over feature count.
Wireless Connectivity and Cloud Integration
Wi-Fi is essential, but how the frame connects to your photos matters. Native integration with Google Photos, Amazon Photos, or Apple’s iCloud means you don’t manage a separate account. Instead, you link your existing service, and photos sync automatically.
Frames that require you to email photos to a dedicated address or upload manually defeat the convenience factor. Seek frames supporting multiple cloud platforms, if you use Google Photos but your spouse prefers Amazon’s cloud, a frame that connects to both prevents arguments.
Bluetooth or Ethernet options add flexibility. Some people live in Wi-Fi dead zones (think a guest bedroom corner) and benefit from Ethernet connectivity via USB or a docking station. Bluetooth lets household members quickly send a single photo without logging into cloud accounts, useful for real-time family moments.
Motion-sensor technology is a nice-to-have. The frame stays off when no one’s around and activates when motion is detected, saving power and reducing constant screen glow. This works especially well in bedrooms or entryways. Check reviews carefully, some motion sensors are overly sensitive and keep the display on constantly.
How to Choose the Right Smart Photo Frame for Your Home
Selecting a frame depends on placement, image quality preferences, and your household setup.
Size and resolution go hand in hand. An 8-inch frame works fine in a bedroom or on a desk but looks undersized on a living room wall. Conversely, a 15-inch frame crammed on a nightstand overwhelms the space. Consider wall mounting or tabletop placement before purchasing. For tabletop displays, 8-10 inches is typical. For walls as focal points, 13-15 inches commands attention.
Resolution matters less than you’d think if the frame will sit across the room, but 1080p (Full HD) or higher ensures crisp details at arm’s length. Anything below 720p shows pixelation: avoid budget frames with lower specs.
Orientation flexibility is underrated. Most frames display photos in landscape (horizontal) or portrait (vertical). Frames that rotate automatically depending on the photo’s aspect ratio feel smarter and display more images beautifully without cropping. If you have a mix of portrait shots and landscape vacation photos, this feature prevents awkward black bars.
Budget typically ranges from $100 to $300 for reliable, feature-rich frames. The lowest-tier options under $80 often have poor cloud integration or require ongoing subscription fees, avoid these unless you’re testing the concept. Mid-range frames ($150–250) offer the best value: solid build quality, reliable syncing, and enough customization to feel personal. High-end frames ($300+) add premium materials, better processors, or unique design elements but aren’t necessary for most homeowners.
Read verified user reviews focusing on real-world issues: Does it actually stay connected overnight? Do photos update reliably? Are there hidden subscription costs? Digital Trends and similar tech sites test these thoroughly and catch problems manufacturer descriptions hide.
Installation and Setup Guide for Homeowners
Installation is straightforward for most homeowners. You’ll need the frame, a power outlet or USB power source, and Wi-Fi credentials.
Physical setup: Decide between wall mounting or tabletop placement. For wall mounting, use a mounting bracket (typically included) and appropriate wall anchors. Drywall anchors work fine for lightweight frames under 3 pounds: heavier frames may need stud-finding and drywall screws into studs. Check the manufacturer’s weight limit before mounting. Locate outlets nearby, having the power cord hidden behind furniture keeps the setup clean.
Tabletop frames need a level, stable surface away from direct sunlight. Sunlight causes glare and can damage the display over time. A bookshelf, dresser, or console table works well.
Electrical consideration: Most frames draw minimal power (5–15 watts), safe to plug into standard outlets. Use a power strip if your outlet is inconveniently located, but avoid extension cords longer than 6 feet (voltage drop can cause issues). Some frames support USB power, letting you plug into a wall adapter or even a powered monitor.
Wi-Fi connection: During initial setup, the frame enters pairing mode and shows nearby networks on its display. Select your home Wi-Fi network and enter your password. If setup stalls, restart the frame and your router, most connection issues resolve after a reboot. Ensure the frame is within reasonable range of your Wi-Fi router: walls between the router and frame can weaken the signal.
Cloud account linking: Open the companion app (or use the frame’s touchscreen menu) and sign into your preferred photo service. Grant permission for the frame to access your photos. Select which albums or folders to display, choosing too many photos makes rotation slow, while too few causes repetition.
Initial testing: Give the frame 24 hours to populate with images and test daily auto-sync by uploading a new photo to your cloud service. Confirm it appears on the frame within 30 minutes. If not, check Wi-Fi stability and account permissions.
For homeowners without strong tech skills, this process may feel daunting, but smart home tech tips and manufacturer support videos walk you through each step visually. Don’t hesitate to contact customer support if you get stuck, most companies respond within 24 hours.
Styling and Decorating With Smart Photo Frames
A smart photo frame isn’t just functional: it’s décor. Styling it thoughtfully elevates the whole room.
Color and finish matter. Black matte frames blend into dark walls or entertainment centers. White or natural wood frames feel warmer and suit farmhouse or minimalist spaces. Stainless steel or brushed metal frames work well in modern kitchens or contemporary living rooms. Choose a finish that complements existing furniture rather than clashing with it.
Matting and bezels: The border around the display affects how it looks. Thin bezels (under 0.5 inches) feel premium and modern: thick bezels look more traditional or album-like. Some frames offer interchangeable mats or bezels, letting you change the look seasonally.
Placement strategy: A frame on a shelf looks best when flanked by other objects, a small plant, a decorative book, or a candle. Leaning against a wall (rather than laying flat) saves space. On walls, consider negative space: mounting a single large frame on a blank wall creates a modern gallery feel, while a cluster of various frames and artwork builds interest.
Photo curation affects ambiance. Avoid random snapshot rotations that make the display feel chaotic. Instead, create themed collections: family portraits, vacation highlights, seasonal nature shots, or black-and-white memories for a cohesive look. Limit the album to 50–100 favorite images rather than syncing your entire library. Quality beats quantity every time.
Lighting consideration: Rooms with good natural light flatter the frame’s display, while dim corners make screens look dark and washed-out. If your chosen location is dim, a nearby table lamp or wall sconce helps the frame shine. Avoid placing the frame where direct sunlight hits it all day, it causes screen washout and shortens the display’s lifespan.
When styled thoughtfully, a smart photo frame becomes a conversation piece, more interesting than static art, more personal than a store-bought print. Visitors naturally gravitate to it, and it genuinely brightens a room by keeping meaningful faces and moments visible daily. You’ll be surprised how often you pause to look at it, especially when new family photos rotate in automatically.
<h2 id="” data-id=””>Final Thoughts
A simply smart home photo frame bridges the gap between digital convenience and physical display. Unlike photos buried in your phone, these frames celebrate the moments worth remembering. Whether you’re reconnecting distant family through shared memories, finally using those vacation shots sitting in your camera roll, or simply upgrading your home’s décor, a smart frame delivers genuine utility paired with aesthetic appeal.
Start with a reputable mid-range frame, ensure Wi-Fi coverage in your chosen location, and curate your photo selection thoughtfully. The setup takes under an hour, and the payoff, a living, breathing display of what matters most, lasts for years. Your home, and your memories, deserve that attention.